The Ultimate California Road Trip Planner: Your Golden State Adventure Guide
So, you wanna map out that ultimate California Road Trip? Don’t even think about winging it. Nope! Planning this kind of epic adventure? It means getting everything set up just right. Kinda like wiring up some crucial piece of tech. You gotta connect your main “brain”—that’s your computer—using a USB port. Usually with a specific cable, you know? This isn’t just plugging it in. It’s about making that first, super vital link. Bringing your journey to life, man. Sets the whole vibe for a hella good time.
Essential planning steps for a successful California road trip, including route mapping and vehicle preparation
Starting any big trip means knowing your core parts. Your “main board,” like an Arduino Uno. Comes with all the hook-ups you need. The USB port? That’s your link to the planning center, your computer. First in a long line of power and info. And most trips include a basic connection cable. It’s usually just part of the first package you grabbed.
Beyond regular USB power, what about outside energy? If your ride or your planning needs more juice than a simple USB port gives? An external adapter is crucial. Also, you can hook right up to specific input pins. Like the Vin and GND on a circuit board, pushin’ 5 volts straight in if needed. Bypassing the computer or adapter completely. For lighter stuff—think just lighting up a little LED or running a plain GPS—the USB power is usually enough.
High-power needs? That’s a different beast. Don’t expect the same port handling basic navigation to fire up some huge thing, like, a motor. For the big jobs? You’ll totally need another power system to keep everything humming. Think about it: your car’s light accessory port just won’t cut it for a camping fridge.
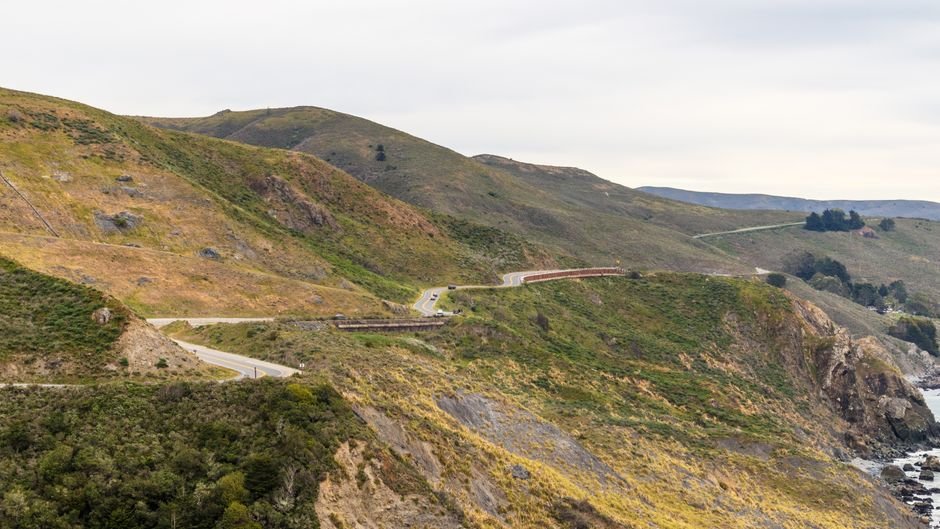
Guidance on iconic coastal drives and breathtaking inland routes suitable for various travel styles
Every good route, whether it’s a killer coastal drive or an inland trek, is built on a bunch of programmed instructions. Your itinerary? It just plays out in different stages. Just like a program’s void setup() and void loop() parts. The setup has all those once-only actions. Your first vehicle check. Loading the map. Setting your very first spot.
But the loop? That’s where the constant stuff happens. Your daily driving. Those repeated stops. The whole rhythm of the journey. In this loop, you’ll “turn on” a destination—take the highway, check out that cool spot—for a set “delay.” Stay for an hour. Camp for a night. Then “turn off” that activity. Move to the next.
This on-off, “digital” way? It’s kind of basic. Like a yes/no switch. Either you’re at the landmark, or you’re not. Digital commands are binary. A destination is “high” (active) or “low” (inactive). No in-between spots. And another thing: No “halfway” on the highway.
But. Some parts of a trip, like those twisty scenic roads or a spur-of-the-moment detour, are more “analog.” These aren’t just on or off. They involve constant, varied stuff. The changing light. Simple shifts in the landscape. The totally unexpected detours. Knowing both the fixed “digital” points and the changing “analog” parts helps you build a really cool trip.
Recommendations for must-visit national parks, vibrant cities, and culturally significant landmarks
Every great travel plan has its main parts. Imagine the main processor. That’s your vehicle’s engine. The core that drives everything. Crystals stabilize your timing. Make sure all your planned stops and sequence are spot on. Tiny LEDs over on the “dashboard” might light up for certain markers. Or just tell you a system is active. Resistors keep stuff balanced.
And then there’s the reset button. Not for your car. For your itinerary. Sometimes. You gotta hit reset. Restart a section of your journey. This button lets you do it. A quick refresh if things go bad. Or you feel like repeating a bit. Keep an eye out for a specific indicator light. Say, near big intersections or your final spot. It often means a key change in your route. On some systems, a built-in light right on the main hub tells you when something big is active or sending its signal.
Practical tips for budgeting, selecting accommodations, and enjoying diverse dining experiences on the road
Planning smartly means using the right gadgets. Think of online platforms like Dips or ChatGPT as your trip builders. You tell them what you want—”drive for an hour, stop for grub, stay in a chill spot for the night”—and these digital helpers spit out a likely plan. They even suggest smart links. Like defaulting to popular stops if you don’t say what you want.
Once you’ve got a generated route? You can copy those digital instructions. Then, open your main planning software. Your offline map. Your GPS app. Or even an old printout. And paste the whole sequence. It’s all about turning that AI guidance into your useful, on-the-ground plan.
A full packing list and safety guidelines tailored to California’s varied climates and terrains
Before you hit the road? Always, always double-check your plan. Your travel software should have a “compile” function. Just like a code editor. This checks your whole itinerary for any booboos, making sure there are no impossible turns or missing bits. A successful check means your plan is good to go.
Next up, it’s time to “upload” your plan to your main device. This means syncing your careful itinerary to your phone. Or GPS system. Or sharing it with your travel buddies. During this upload, the system will confirm the successful transfer with a “Done upload” message.
Because your vehicle, like an Arduino, needs to be spotted by your planning software. It should show what “port” it’s connected to. Like “COM4”. If your GPS or vehicle doesn’t get recognized? You might need to manually pick its type from a list in settings. Could be a common model. Or something more specific. If you’re ever unsure about the port connection? Your computer’s device manager can usually tell you which USB serial port your travel electronics are using. Disconnect? Port disappears. Reconnect it? It’s back. A simple sure sign your device is linked.
Strategies for discovering hidden gems and authentic local experiences beyond typical tourist destinations
Before you commit to a long drive or a specific route? Run a simulation. Tools like Tinkercad let you visually “test” your itinerary. You set up the route. Input your commands. Then “start the simulation.” Watch it! Your planned journey unfolds virtually. Does the traffic actually flow like you thought? Do your stops line up with the timing? This helps you spot issues. And refine timings before you’re out there. If something doesn’t look right, simply “stop the simulation.” Adjust your plan.
Frequently Asked Questions
Q: How do you hook up an Arduino Uno to a computer for programming?
A: Get a USB cable. Plug it into the Arduino Uno’s USB port. Connect it to your computer.
Q: What’s the deal with digital versus analog inputs/outputs on an Arduino?
A: Digital inputs/outputs are basic. Just on or off. Like a light switch. Analog inputs/outputs can handle lots of different values. All the way from minimum to maximum.
Q: How does an Arduino program run usually?
A: An Arduino program starts with the void setup() part once. Then it just keeps looping through the code in the void loop() function forever.